
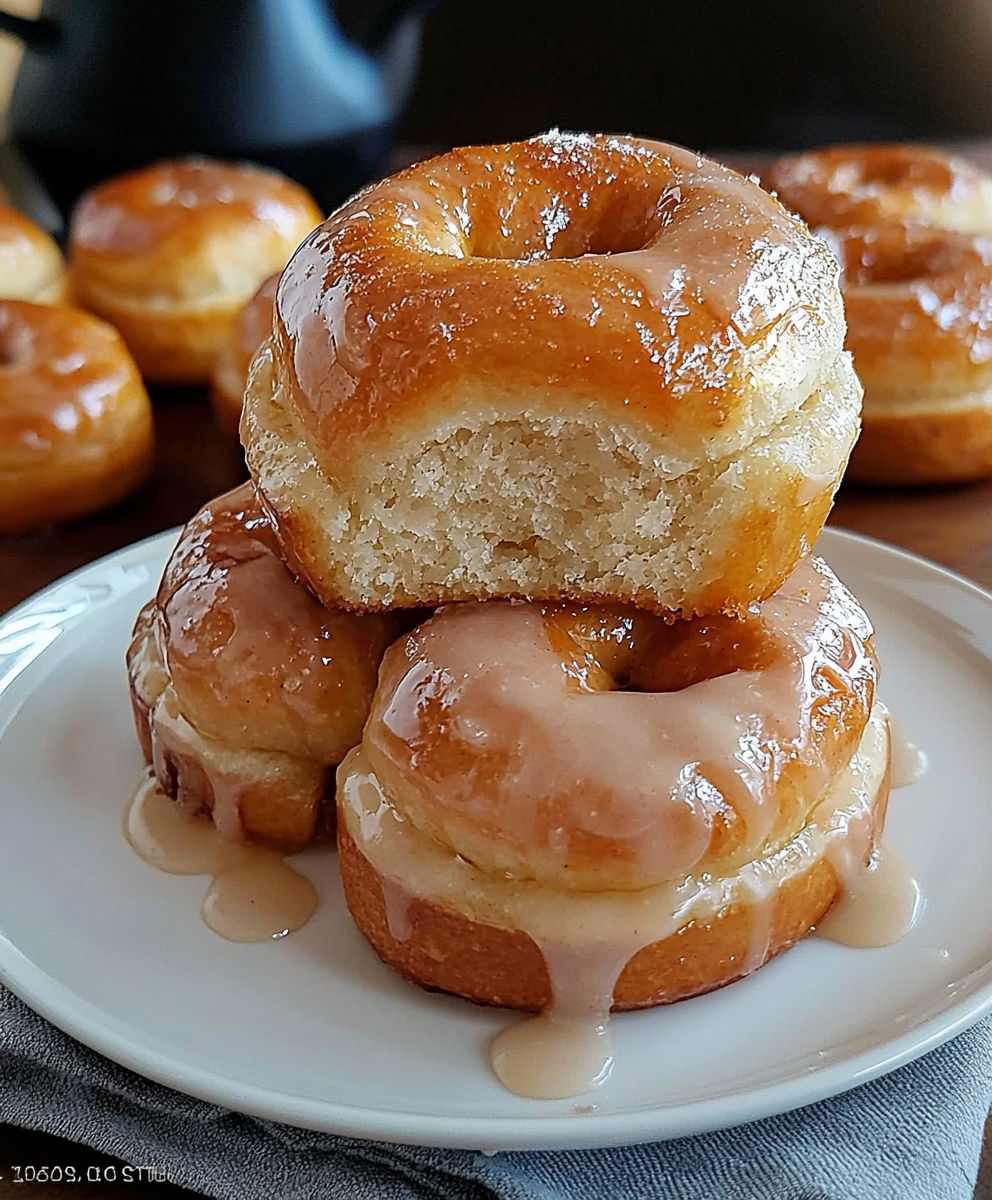
Homemade Honey Buns are a delightful treat that can transform any ordinary day into a special occasion. The moment you take a bite, the soft, fluffy texture combined with the sweet, sticky honey glaze creates a symphony of flavors that dance on your palate. These delectable pastries have a rich history, often associated with family gatherings and celebrations, making them a beloved staple in many households. I remember the first time I tasted homemade honey buns; the warm aroma wafting through the kitchen was simply irresistible. People adore this dish not only for its incredible taste but also for its convenience—perfect for breakfast, snacks, or even dessert. Join me as we explore the art of making these scrumptious homemade honey buns that are sure to become a favorite in your home!
Ingredients:
- 4 cups all-purpose flour
- 1/2 cup granulated sugar
- 1 packet (2 1/4 teaspoons) active dry yeast
- 1 teaspoon salt
- 1/2 teaspoon ground cinnamon
- 1/2 cup whole milk
- 1/2 cup unsalted butter, melted
- 2 large eggs
- 1/4 cup honey
- 1/2 cup brown sugar, packed
- 1 teaspoon vanilla extract
- 1/4 cup chopped nuts (optional)
- 1/2 cup powdered sugar (for glaze)
- 2 tablespoons milk (for glaze)
Preparing the Dough
Let’s get started on making these delicious homemade honey buns! The first step is to prepare the dough.
- In a large mixing bowl, combine 2 cups of the all-purpose flour, granulated sugar, yeast, salt, and ground cinnamon. Mix these dry ingredients together until they are well combined.
- In a small saucepan, heat the whole milk and melted butter over low heat until it’s warm but not boiling (about 110°F or 43°C). You want it warm enough to activate the yeast but not so hot that it kills it.
- Once the milk and butter mixture is warm, add the honey and stir until it’s fully dissolved.
- In a separate bowl, whisk together the eggs and vanilla extract. Then, add this mixture to the warm milk and butter mixture, stirring well to combine.
- Pour the wet ingredients into the dry ingredients and mix until combined. Gradually add the remaining flour, one cup at a time, until a soft dough forms. You may not need all the flour, so keep an eye on the consistency.
- Once the dough comes together, turn it out onto a floured surface and knead it for about 5-7 minutes until it’s smooth and elastic. If the dough is too sticky, sprinkle a little more flour as needed.
- Shape the dough into a ball and place it in a greased bowl, turning it to coat all sides. Cover the bowl with a clean kitchen towel and let it rise in a warm place for about 1 hour, or until it has doubled in size.
Preparing the Filling
While the dough is rising, let’s prepare the filling that will make these honey buns extra special.
- In a small bowl, mix together the brown sugar and chopped nuts (if using). This will be the filling for your honey buns.
- Once the dough has risen, punch it down to release the air. Turn it out onto a floured surface again and roll it out into a rectangle, about 1/4 inch thick.
- Sprinkle the brown sugar mixture evenly over the rolled-out dough, making sure to cover it completely.
- Starting from one long edge, carefully roll the dough into a tight log. Pinch the seam to seal it and tuck the ends under to create a nice shape.
Cutting and Shaping the Buns
Now that we have our filled dough log, it’s time to cut it into individual buns.
- Using a sharp knife or a bench scraper, cut the log into 12 equal pieces. You can adjust the size based on how big you want your honey buns to be.
- Place the cut buns into a greased baking dish, leaving a little space between each one to allow for rising. You can use a 9×13 inch baking dish or two round cake pans.
- Cover the buns with a kitchen towel and let them rise again for about 30-45 minutes, or until they have puffed up and are touching each other.
Baking the Honey Buns
It’s almost time to enjoy these sweet treats! Let’s get them in the oven.
- Preheat your oven to 350°F (175°C) while the buns are rising.
- Once the buns have risen, place them in

Conclusion:
In summary, these homemade honey buns are an absolute must-try for anyone looking to indulge in a sweet, fluffy treat that’s perfect for breakfast or an afternoon snack. The combination of warm, soft dough and the delightful sweetness of honey creates a flavor that’s simply irresistible. Plus, the aroma that fills your kitchen while they bake is enough to make anyone’s mouth water! For serving suggestions, I love to enjoy these honey buns fresh out of the oven, drizzled with a little extra honey or a light glaze for that extra touch of sweetness. You can also pair them with a dollop of whipped cream or a scoop of vanilla ice cream for a delicious dessert twist. If you’re feeling adventurous, try adding some cinnamon or nuts to the dough for a unique variation that will keep your taste buds guessing! I encourage you to give this recipe a try and experience the joy of making your own homemade honey buns. They’re not only fun to make, but they also bring a sense of warmth and comfort that store-bought treats just can’t match. Once you’ve baked your batch, I’d love to hear about your experience! Share your thoughts, any variations you tried, or even a picture of your delicious creations. Let’s spread the love for these homemade honey buns together! PrintHomemade Honey Buns: The Ultimate Recipe for Soft and Sweet Treats
Enjoy these soft and sweet homemade honey buns filled with a delightful brown sugar and nut mixture, topped with a creamy glaze. Perfect for breakfast or as a sweet snack any time of the day!
- Prep Time: 75 minutes
- Cook Time: 10 minutes
- Total Time: 10 minutes
- Yield: 4 servings 1x
Ingredients
Scale- 4 cups all-purpose flour
- 1/2 cup granulated sugar
- 1 packet (2 1/4 teaspoons) active dry yeast
- 1 teaspoon salt
- 1/2 teaspoon ground cinnamon
- 1/2 cup whole milk
- 1/2 cup unsalted butter, melted
- 2 large eggs
- 1/4 cup honey
- 1/2 cup brown sugar, packed
- 1 teaspoon vanilla extract
- 1/4 cup chopped nuts (optional)
- 1/2 cup powdered sugar (for glaze)
- 2 tablespoons milk (for glaze)
Instructions
- In einer großen Schüssel Mehl, Salz und Hefe vermengen.
- Wasser hinzufügen und zu einem Teig verrühren.
- Knoblauch und Olivenöl unterrühren.
- Teig 12 Stunden gehen lassen.
- Den Teig auf einer bemehlten Fläche ausrollen und die Füllung gleichmäßig darauf verteilen.
- Den Teig von einer langen Seite her aufrollen und die Naht gut andrücken.
- Die Rolle in 12 gleich große Stücke schneiden und in eine gefettete Backform legen.
- Abdecken und 30-45 Minuten gehen lassen, bis sie aufgegangen sind.
- Den Ofen auf 175°C vorheizen.
- Die Brötchen 20-25 Minuten backen, bis sie goldbraun sind.
- Die Glasur zubereiten, indem man Puderzucker und Milch in einer kleinen Schüssel glatt rührt.
- Die Brötchen nach dem Backen aus dem Ofen nehmen und einige Minuten abkühlen lassen, bevor man die Glasur darüberträufelt.
Notes
- Feel free to customize the filling by adding cinnamon or other spices to the brown sugar mixture.
- For a richer flavor, you can substitute some of the all-purpose flour with whole wheat flour.
- Store any leftovers in an airtight container at room temperature for up to 2 days, or refrigerate for longer freshness.
Leave a Comment